Tuesday, March 22, 2016

List of beacon manufacturers

There are a lot of different companies in the beacon market today.
Here I tried to collect some of them with their product description.


The list will be updated periodically.

Friday, January 11, 2013

ssh tunneling

The SSH tunneling (also know as port forwarding) is ability to access computer ip ports through third computer, assuming that direct access are forbidden and we have an ssh access to the third computer which has access to that port.

This kind of techniques can be used also to securely connect to remotes computer's only locally open ports. For example lets we have some server running on port 5432 on dbserver machine. There is no permission to connect to dbserver:5432 from outside, but we have an access to dbserver with ssh.
On our local computer by running the following
ssh -NC -L 1234:127.0.0.1:5432 dbserver
the ssh will listen on local machine port 1234 and all data packets will forward to dbserver, where the ssh server will redirect them to 127.0.0.1:5432
The -C option is for compressing the data, and the -N option for not executing any command remotely(by default ssh executes specified command or login to the shell)

By adding -f we can send ssh to background
ssh -NC -L 1234:127.0.0.1:5432 -f dbserver

Saturday, May 5, 2012

Samsung Galaxy S2 codes

Here are some codes for Samsung Galaxy S2.
  • *#1234#  -- Firmware Version.
  • *#232337#  -- Bluetooth MAC Address.
  • *2767*3855# -- Factory Reset.

Tuesday, April 24, 2012

VirtualBox shared folders

In the Oracle VirtualBox, to add a shared folder to a Linux guest, open Devices>Shared Folders...  and click Add Shared Folder (a tiny "plus" icon on the right). Then fill folder path and folder name.
In Linux, do the mount by the following commands:
> sudo mkdir /home/shared # creating mount point
> sudo mount -t vboxsf VShared /home/shared
# use previously filled folder name
After every reboots the mount command is needed to repeat.
To do it automatically, just add the following lines to fstab.
> sudo echo "VShared    /home/shared    vboxsf    rw    0    0" >> /etc/fstab


Friday, April 20, 2012

find | xargs with spaces in filenames

The following command is one of the simplest way to find a text in the files.
    find * | xargs grep "text"
but if the file name contains a space then the xargs command split it and transfer spited items as a separate files to the grep, and an error occurs:
    grep: "a part of file name": No such file or directory

To overcome this issue the find has an -print0 option, which separates file names with ASCII NUL instead of new line. And the -0 option will signal the xargs to use NUL as a separator instead of blank spaces.
    find * -print0 | xargs -0 grep "text"

Tuesday, April 3, 2012

Compile gdb for embedded devices

To debug a program on embedded devices with limited resources(memory, CPU) the gdbserver is used. The gdbserver is running on the embedded device, while the gdb is running on a regular PC and connect with gdbserver via network. The first step is to compile gdb for embedded device(platform). The following steps are for platform with ARM CPU.

Get the sources from official site: http://www.gnu.org/software/gdb/download/
Compile gdb
>tar -zxf gdb-7.4.tar.gz #extract the sources
>cd gdb-7.4
> ./configure --prefix=/home/programs/gdb/ --build=x86 --host=x86 --target=arm-linux
"--prefix"  - where to install the program
"--build" - specify which platform is used for compilation.
"--host"  - specify which platform is used for run gdb.
"--target" - specify which platform is used for run the debugging program.
>make
>make install

Compile gdbserver(the gcc compiler for arm-linux is necessary)
>tar -zxf gdb-7.4.tar.gz #extract the sources into new folder
>cd gdb/gdbserver
>./configure --host=arm-linux
>make
during the compilation linux-arm-low.c:642: error: `PTRACE_GETSIGINFO' undeclared (first use in this function) error occurs. Seems a include is missing, but by adding the following line before the error line, the problem will be solved.
#define PTRACE_GETSIGINFO    0x4202
>make

Copy the gdbserver executable from current directory to the target device and run:
>gdbserver :<port> <program>
From the PC run gdb and connect to gdbserver vi the network:
(gdb)>target remote ip:port
Now the program can be debuged with usual gdb commands.


Tuesday, February 7, 2012

_init and _fini (obsolete functions)

There are two special functions for library construction and destruction. Despite they are obsolete and replaced by generic constructor/destructor functions, they are used in a lot of libraries. Lets write a simple library with one some_func() function and with _init(), _fini() special functions.


In the above code there are 3 files: the library itself - samplelib.h, samplelib.c  and the application - main.c.

for compiling the library:
    $ gcc -fPIC -c samplelib.c
    $ gcc -nostartfiles -shared -o libsamplelib.so samplelib.o

Here -fPIC option is standing for position independent code. The -shared option is for shared library creation. By default gcc uses _fini () and _init() defined in crti.o, so -nostartfiles signals to gcc to not do that.
 And to compile the application we run the following.
    $ gcc -o main main.c -L. -lsamplelib
Here -L. option informs to gcc to search libraries in current directory, and -lsamplelib - to use libsamplelib.so shared library.

Finally by running the program the following will be outputted:
    samplelib: _init is called
    main: main is called
    samplelib: some_func is called
    samplelib: _fini is called

Saturday, May 7, 2011

Arduino Uno: Upload new firmware to the Atmega8U2

In the previous article it is described how to put Arduino Uno into DFU mode. To upload a new firmware the dfu-programmer is needed (Ubuntu users: sudo apt-get install dfu-programmer). Windows user can try FLIP software from Atmel. You can upload already compiled hex code from Arduino package or build it from sources (/usr/share/arduino/hardware/arduino/firmwares/arduino-usbserial/Arduino-usbserial-uno.hex or the latest one from github https://github.com/arduino/Arduino/raw/master/hardware/arduino/firmwares/arduino-usbserial/Arduino-usbserial-uno.hex). The steps are:
Put Uno into DFU mode,
sudo dfu-programmer at90usb82 erase
sudo dfu-programmer at90usb82 flash .../Arduino-usbserial-uno.hex
sudo dfu-programmer at90usb82 reset 
reconnect the USB cable.

The LUFA library is needed for building hex file from sources. Download the lib version 100807. Current sources doesn't compile with the latest LUFA(version 101122).
mkdir uno
cd uno
cp -r /usr/share/arduino/hardware/arduino/firmwares/arduino-usbserial ./
wget http://www.fourwalledcubicle.com/files/LUFA/LUFA-100807.zip
unzip LUFA-100807.zip
mv LUFA\ 100807/ LUFA
Fix the LUFA path in "arduino-usbserial/makefile":
     # Path to the LUFA library
     LUFA_PATH = ../..
change to
     # Path to the LUFA library
     LUFA_PATH = ../LUFA
make all
After the successful build the file "Arduino-usbserial.hex" is created. Now you can upload this hex file using above steps.

P.S. After the new firmware upload try to upload and run something using Arduino IDE(the Blink example), to make sure the "USB to Serial converter" firmware works fine.

That's all.

Tuesday, April 26, 2011

Arduino Uno

Arduino Uno is the latest version of the Arduino boards (next to the Duemilanove). The major difference from the previous board is in that it uses the Atmega8U2 micro-controller (instead of FTDI) for communicating with a computer. The Atmega8U2 is programmed as a USB to serial converter by default, but it can be programmed as any other USB devices (keyboard, mouse, joystick and etc...).
Arduino Uno
To upload a new firmware to the Atmega8U2, we need to reset the chip and put it into a DFU mode. There is a description in the Ardunio site how to do that. It can be done easily using 2 M/M jumper wires
M/M jumper wire
Instead of using ground pads(from the description in Arduino site), we can use Arduino's GND pins.
1)Connect Arduino Uno to the computer
2)Hold first wire as pictured in the below image.
3)Connect second wire.
4)Remove second wire then remove first.
Now your Arduino is in DFU mode
The Device manager (in windows 7)
To return to the USB to serial converter mode, just disconnect and connect Arduino.
The upload of a firmware will be in the next article.

Monday, April 25, 2011

Facebook: Sort people by number of mutual friends(with Chrome support).

The script from the previous article can be used in Chrome also. Just click on the view raw and then click continue
Now install the script as an extension:
Now go to Facaebook->Find Friends
If the button doesn't appear, then refresh the page by pressing F5 (The script has an issue and sometimes the button isn't added, the temporary solution is refreshing the page until the problem will be fixed).
That's all.

Flightgear and Tx/Rx system

In the previous article the Flightgear's aircraft controlled using external program and in another article the Tx/Rx system connected to computer using Arduino. Today we will use those knowledges to connect Tx/Rx to Flightgear. Download the project from github and do the following steps.
1)Copy protocol files from Protocol/ to C:\Program Files (x86)\FlightGear\data\Protocol\
2)Compile and upload Rxreader/Rxreader.pde to the Arduino.
3)Connect Receiver to the Arduino
4)Run the C# program and connect to the Arduino and click to calibrate (this determines min-max values). When min-max values determined, finish the calibration.
5)Run Flightgear with the following arguments.
"C:\Program Files (x86)\FlightGear\bin\Win32\fgfs" ^
 "--fg-root=C:\Program Files (x86)\FlightGear\data" ^
 "--aircraft=Malolo1" ^
 "--generic=socket,out,10,127.0.0.1,49001,udp,outputprotocol" ^
 "--generic=socket,in,10,,49000,udp,inputprotocol" ^
 "--timeofday=noon"
6) Connect to Arduino, and connect the input and the output to Flightgear.
 
7)Try do not crash the airplane :)
That's all.

Wednesday, April 20, 2011

executable jpg files

On the following screenshot there are 3 files with the same thumbnail picture. The file extensions aren't hided. Now can you guess the formats of those files?

The first and the second files are executable, while the third file is an icon file. But, you can say, the file with "jpg" extension is a picture not an executable. It is true. But the problem is that the extension of "imggoofyrcs.jpg" isn't "jpg". How is it possible? The cause of this is the Unicode symbol \u202E(Right-To-Left Override):
The executable can open a picture to deceive a user and do anything in the background. The following code demonstrate how to open a picture and run a "calc" program.

Saturday, April 16, 2011

Facebook: Sort people by number of mutual friends

The Facebook's Find-Friends page lists people, whom Facebook thinks we may know. There are some ways to filter people by hometown or college (and etc...), but it lacks the simple ability to sort people by the number of mutual friends. Using Firefox and Greasemonkey add-on and the following script it can be done easily.
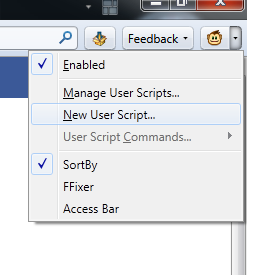
Add new user script in the Greasemonkey:
Add new user script.
Fill up the following information:
Fill-up.
Then copy the following script and past it to the newly opened sortby.user.js file and save it.

In the Facebook's Find Friends page now you can see a button near the hometown filter.
Click it and it will sort people by number of mutual friends.

That's all.

Tuesday, April 12, 2011

Arduino and Tx/Rx system

In the previous article the PWM signal was described, which used to control servo motors. Today we will use the following Transmitter/Receiver (Tx/Rx) and the Arduino to read PWM signals.
Tx/Rx manufactured by www.HobbyKing.com
The above Tx/Rx systems usually used for controlling airplanes, helicopters and other remote vehicles. This one has 6 channel, which means it can control 6 different motors (servos and other types).
In the following picture you can see 7 row of pins(6 channels + battery).
Receiver
This Tx/Rx system comes without any documentation, so the only way to get more information is to google the Internet. Actually I thought that the receiver gets it's power from the battery pins(I don't know why 3 pins) and generate appropriate PWM signals on all channels, but I discover the following:
If connect only(without battery connected) channel pins to appropriate Arduino pins(+5V to +5V, Gnd to Gnd, and Signal to digital port 2), then the receiver will work and on the signal pin it generates PWM signal, coming from transmitter. To read the signal, connect 2nd channel pins to Arduino appropriate pins(The 2nd channel corresponds to throttle). Connect signal pin to Arduino digital pin 2.

The Arduino has a PulseIn function, which can be used to read the PWM pulse width. The micros function returns the number of microseconds since the Arduino began running. Compile and upload the following code and run it then switch-on the transmitter.
Before switching on the transmitter, the time interval is about 100ms, which is equal to 50ms timeout time + Serial print times, and the pulse width is 0(no signal). When the transmitter switched-on, the pulse width is near to 1460us and time interval reduced to ~66ms, which now is equal to ~20ms period time + Serial print times.
Switching-on transmitter
And this is the screenshot of Serial output when the throttle is changed by moving joystick up and down.
Moving throttle joystick up/down
That's all.

Monday, April 11, 2011

Servo motors and PWM

In the previous article we use Arduino's Servo library to control servo motors. Today we will try to understand how Servo library works. The servo motors are controlled by digital PWM signals. Those signals are square waves with a period about 20-22ms. And the pulse width(usually ~0.5-2.5ms) is corresponds to the position of servo motor.
This a sample signal
There is another overloaded Servo.attach function (used to attach servo to the pin) with 3 arguments:
    servo.attach(pin, min, max) 
(min,max) are the pulse minimum and maximum widths in microseconds. Default values are 544us and 2400us(you can also check them in the <Arduino-dir>\libraries\Servo\Servo.h file, MIN_PULSE_WIDTH and MAX_PULSE_WIDTH macros). Most of hobby servo motors have those default values, but if your servo doesn't work, then you need to dig into the documentation to find out right values. This Servo library takes minimum 20ms for signal period: see <Arduino-dir>\libraries\Servo\Servo.h file:
    #define REFRESH_INTERVAL    20000 // minumim time to refresh servos in microseconds
That's all.

Wednesday, April 6, 2011

Flightgear: control aircraft externally

In the previous article the Flightgear program's some features were discussed. Today's topic will be about controlling aircraft through sockets from another program. There is a command line option "--generic" , which can be used for modifying items of property tree(see previous article, about http://localhost:1234).
Run the program with the following options.
The first generic argument means: Use sockets, for sending data out, 10 times a second, to the 127.0.0.1 machine(this is localhost's ip address), using the port 49001, use UDP protocol, the actual data which sent out are described in file "outputprotocol".
The second generic argument means: Use sockets again, for getting data from out, 10 times a second, skip the ip address, using the port 49000, use UDP protocol again, the coming data described in the file "inputprotocol".
If the program hangs, this means you are using the Flightgear version 2.0.0, which has a known bug and you need to downgrade to the version 1.9.1. Now if the hanging is over, then the program must give an error(see console's screen), because "outputprotocol" and "inputprotocol" files doesn't exists.
The following is "inputprotocol.xml" file's content, which describes 3 values, that the program will wait for input(aileron, elevator and throttle).
The following is "outputtprotocol.xml" file's content,which describes the same 3 values from input and plus one more (the speed of aircraft).
Now copy those files to the "C:\Program Files (x86)\FlightGear\data\Protocol" directory and run the program again. It will again give error(Error reading data), because no one send data to the input.
Now lets write a program in C#, which will send the input data to and receive output data from Flightgear. Add the controls to the main form as pictured in the screenshot:
We will use timer to send data in every 100ms(10 times in a second as described in the argument). This is sending part code: We will use threads to asynchronously get data from Flightgear. This is it:That's all.

Tuesday, April 5, 2011

Flightgear

Flightgear is open source flight simulator. It is weighted ~300MB for windows (relatively low compared to other simulators). It can be used not only for gaming. There are some R/C models, which can be used to practice on them. For example Malolo aircraft. Download and extract it to  C:\Program Files (x86)\FlightGear\data\Aircraft (Ubuntu: /usr/share/games/FlightGear/Aircraft/).
Then run the following from command line:
    "C:\Program Files (x86)\FlightGear\bin\Win32\fgfs" ^
        "--fg-root=C:\Program Files (x86)\FlightGear\data"  ^
        "--aircraft=Malolo1"
 or in Ubuntu
    fgfs --aircraft=Malolo1

Wait a minute, while the program finish loading, then you can drive the airplane using following keys.
    V                   : Change viewpoint
    Page-Up       : Increase throttle
    Page-Down  : Decrease throttle
    X                   : Zoom-in
    Shift-X          : Zoom-out
    Arrow keys   : Control elevator and aileron.
It is OK when you crash a plane just after a few seconds of flying :). Do some practice.

Flightgear has many useful features, and one of them is the ability to show the status of every components in the environment. Just run it adding the "--httpd=1234" argument and it creates a local web server. Navigating to http://localhost:1234 you can see a tree structure of all elements, which can be modified from browser also. For example start the program, change the viewpoint and navigate to http://localhost:1234/controls/engines/engine and click on throttle and change the value to 0.2.

Thursday, March 31, 2011

Linux and SETUID (SETGID, Sticky bit)

Every file in Linux has read, write and execute rights for the owner, group and others. Besides those attributes there are 3 extra attributes setuid, setgid and sticky bit.
1) The setuid attribute is meaningful for executable files. If this bit is set then the user ID would be set as that of the owner of executable rather than the current user. For example the sudo tool owner is root and the setuid bit is set on, and when another user run this program, it will be executed as root. If set off the setuid attribute, then the sudo tool will not work, because it will run as a normal user without root permissions.

 2) Setgid attribute is the analog to setuid, but for group ID.

3) In Linux sticky bit is meaningful for directories only(in old *nix systems it had another meaning also). If this bit is enabled on directory then the files in that directory may only be deleted or renamed by root or by their owner.

One more sample related to setuid

Tuesday, March 29, 2011

Arduino and Servo motors

Arduino has a Servo library which allows to control servo motors. Today we will use the following small servo motor and write a program, which read a angle value from Serial port and rotate servo motor according to it.
This is the source code of program

Compile and upload above code to Arduino, then connect control pin(gray wire) of Servo motor to Arduino pin 11, connect black wire to Gnd of Arduino and red wire to +5V. This is how it looks:

And this is a video demonstration of moving Servo 0 -> 90 -> 180 -> 0 -> 90:

Monday, March 28, 2011

Security bug in Ubuntu 10.10

Yes, Ubuntu also has security bugs. But this one can be used in the last steps of attacking. There are some requirements for this code to work. Attacker need to find a vulnerability in a process and run a shellcode and if that executable has CAP_SYS_ADMIN capability, then using this bug it can get root privileges.

To run this exploit download source from http://www.exploit-db.com/download/15944 and do the following steps: