Tuesday, April 26, 2011

Arduino Uno

Arduino Uno is the latest version of the Arduino boards (next to the Duemilanove). The major difference from the previous board is in that it uses the Atmega8U2 micro-controller (instead of FTDI) for communicating with a computer. The Atmega8U2 is programmed as a USB to serial converter by default, but it can be programmed as any other USB devices (keyboard, mouse, joystick and etc...).
Arduino Uno
To upload a new firmware to the Atmega8U2, we need to reset the chip and put it into a DFU mode. There is a description in the Ardunio site how to do that. It can be done easily using 2 M/M jumper wires
M/M jumper wire
Instead of using ground pads(from the description in Arduino site), we can use Arduino's GND pins.
1)Connect Arduino Uno to the computer
2)Hold first wire as pictured in the below image.
3)Connect second wire.
4)Remove second wire then remove first.
Now your Arduino is in DFU mode
The Device manager (in windows 7)
To return to the USB to serial converter mode, just disconnect and connect Arduino.
The upload of a firmware will be in the next article.

Monday, April 25, 2011

Facebook: Sort people by number of mutual friends(with Chrome support).

The script from the previous article can be used in Chrome also. Just click on the view raw and then click continue
Now install the script as an extension:
Now go to Facaebook->Find Friends
If the button doesn't appear, then refresh the page by pressing F5 (The script has an issue and sometimes the button isn't added, the temporary solution is refreshing the page until the problem will be fixed).
That's all.

Flightgear and Tx/Rx system

In the previous article the Flightgear's aircraft controlled using external program and in another article the Tx/Rx system connected to computer using Arduino. Today we will use those knowledges to connect Tx/Rx to Flightgear. Download the project from github and do the following steps.
1)Copy protocol files from Protocol/ to C:\Program Files (x86)\FlightGear\data\Protocol\
2)Compile and upload Rxreader/Rxreader.pde to the Arduino.
3)Connect Receiver to the Arduino
4)Run the C# program and connect to the Arduino and click to calibrate (this determines min-max values). When min-max values determined, finish the calibration.
5)Run Flightgear with the following arguments.
"C:\Program Files (x86)\FlightGear\bin\Win32\fgfs" ^
 "--fg-root=C:\Program Files (x86)\FlightGear\data" ^
 "--aircraft=Malolo1" ^
 "--generic=socket,out,10,127.0.0.1,49001,udp,outputprotocol" ^
 "--generic=socket,in,10,,49000,udp,inputprotocol" ^
 "--timeofday=noon"
6) Connect to Arduino, and connect the input and the output to Flightgear.
 
7)Try do not crash the airplane :)
That's all.

Wednesday, April 20, 2011

executable jpg files

On the following screenshot there are 3 files with the same thumbnail picture. The file extensions aren't hided. Now can you guess the formats of those files?

The first and the second files are executable, while the third file is an icon file. But, you can say, the file with "jpg" extension is a picture not an executable. It is true. But the problem is that the extension of "imggoofyrcs.jpg" isn't "jpg". How is it possible? The cause of this is the Unicode symbol \u202E(Right-To-Left Override):
The executable can open a picture to deceive a user and do anything in the background. The following code demonstrate how to open a picture and run a "calc" program.

Saturday, April 16, 2011

Facebook: Sort people by number of mutual friends

The Facebook's Find-Friends page lists people, whom Facebook thinks we may know. There are some ways to filter people by hometown or college (and etc...), but it lacks the simple ability to sort people by the number of mutual friends. Using Firefox and Greasemonkey add-on and the following script it can be done easily.
Add new user script in the Greasemonkey:
Add new user script.
Fill up the following information:
Fill-up.
Then copy the following script and past it to the newly opened sortby.user.js file and save it.

In the Facebook's Find Friends page now you can see a button near the hometown filter.
Click it and it will sort people by number of mutual friends.

That's all.

Tuesday, April 12, 2011

Arduino and Tx/Rx system

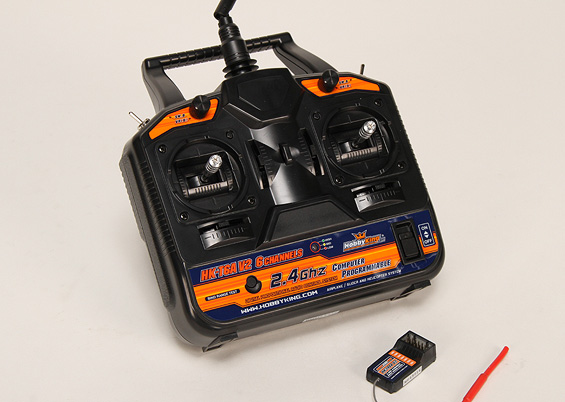
In the previous article the PWM signal was described, which used to control servo motors. Today we will use the following Transmitter/Receiver (Tx/Rx) and the Arduino to read PWM signals.
Tx/Rx manufactured by www.HobbyKing.com
The above Tx/Rx systems usually used for controlling airplanes, helicopters and other remote vehicles. This one has 6 channel, which means it can control 6 different motors (servos and other types).
In the following picture you can see 7 row of pins(6 channels + battery).
Receiver
This Tx/Rx system comes without any documentation, so the only way to get more information is to google the Internet. Actually I thought that the receiver gets it's power from the battery pins(I don't know why 3 pins) and generate appropriate PWM signals on all channels, but I discover the following:
If connect only(without battery connected) channel pins to appropriate Arduino pins(+5V to +5V, Gnd to Gnd, and Signal to digital port 2), then the receiver will work and on the signal pin it generates PWM signal, coming from transmitter. To read the signal, connect 2nd channel pins to Arduino appropriate pins(The 2nd channel corresponds to throttle). Connect signal pin to Arduino digital pin 2.

The Arduino has a PulseIn function, which can be used to read the PWM pulse width. The micros function returns the number of microseconds since the Arduino began running. Compile and upload the following code and run it then switch-on the transmitter.
Before switching on the transmitter, the time interval is about 100ms, which is equal to 50ms timeout time + Serial print times, and the pulse width is 0(no signal). When the transmitter switched-on, the pulse width is near to 1460us and time interval reduced to ~66ms, which now is equal to ~20ms period time + Serial print times.
Switching-on transmitter
And this is the screenshot of Serial output when the throttle is changed by moving joystick up and down.
Moving throttle joystick up/down
That's all.

Monday, April 11, 2011

Servo motors and PWM

In the previous article we use Arduino's Servo library to control servo motors. Today we will try to understand how Servo library works. The servo motors are controlled by digital PWM signals. Those signals are square waves with a period about 20-22ms. And the pulse width(usually ~0.5-2.5ms) is corresponds to the position of servo motor.
This a sample signal
There is another overloaded Servo.attach function (used to attach servo to the pin) with 3 arguments:
    servo.attach(pin, min, max) 
(min,max) are the pulse minimum and maximum widths in microseconds. Default values are 544us and 2400us(you can also check them in the <Arduino-dir>\libraries\Servo\Servo.h file, MIN_PULSE_WIDTH and MAX_PULSE_WIDTH macros). Most of hobby servo motors have those default values, but if your servo doesn't work, then you need to dig into the documentation to find out right values. This Servo library takes minimum 20ms for signal period: see <Arduino-dir>\libraries\Servo\Servo.h file:
    #define REFRESH_INTERVAL    20000 // minumim time to refresh servos in microseconds
That's all.

Wednesday, April 6, 2011

Flightgear: control aircraft externally

In the previous article the Flightgear program's some features were discussed. Today's topic will be about controlling aircraft through sockets from another program. There is a command line option "--generic" , which can be used for modifying items of property tree(see previous article, about http://localhost:1234).
Run the program with the following options.
The first generic argument means: Use sockets, for sending data out, 10 times a second, to the 127.0.0.1 machine(this is localhost's ip address), using the port 49001, use UDP protocol, the actual data which sent out are described in file "outputprotocol".
The second generic argument means: Use sockets again, for getting data from out, 10 times a second, skip the ip address, using the port 49000, use UDP protocol again, the coming data described in the file "inputprotocol".
If the program hangs, this means you are using the Flightgear version 2.0.0, which has a known bug and you need to downgrade to the version 1.9.1. Now if the hanging is over, then the program must give an error(see console's screen), because "outputprotocol" and "inputprotocol" files doesn't exists.
The following is "inputprotocol.xml" file's content, which describes 3 values, that the program will wait for input(aileron, elevator and throttle).
The following is "outputtprotocol.xml" file's content,which describes the same 3 values from input and plus one more (the speed of aircraft).
Now copy those files to the "C:\Program Files (x86)\FlightGear\data\Protocol" directory and run the program again. It will again give error(Error reading data), because no one send data to the input.
Now lets write a program in C#, which will send the input data to and receive output data from Flightgear. Add the controls to the main form as pictured in the screenshot:
We will use timer to send data in every 100ms(10 times in a second as described in the argument). This is sending part code: We will use threads to asynchronously get data from Flightgear. This is it:That's all.

Tuesday, April 5, 2011

Flightgear

Flightgear is open source flight simulator. It is weighted ~300MB for windows (relatively low compared to other simulators). It can be used not only for gaming. There are some R/C models, which can be used to practice on them. For example Malolo aircraft. Download and extract it to  C:\Program Files (x86)\FlightGear\data\Aircraft (Ubuntu: /usr/share/games/FlightGear/Aircraft/).
Then run the following from command line:
    "C:\Program Files (x86)\FlightGear\bin\Win32\fgfs" ^
        "--fg-root=C:\Program Files (x86)\FlightGear\data"  ^
        "--aircraft=Malolo1"
 or in Ubuntu
    fgfs --aircraft=Malolo1

Wait a minute, while the program finish loading, then you can drive the airplane using following keys.
    V                   : Change viewpoint
    Page-Up       : Increase throttle
    Page-Down  : Decrease throttle
    X                   : Zoom-in
    Shift-X          : Zoom-out
    Arrow keys   : Control elevator and aileron.
It is OK when you crash a plane just after a few seconds of flying :). Do some practice.

Flightgear has many useful features, and one of them is the ability to show the status of every components in the environment. Just run it adding the "--httpd=1234" argument and it creates a local web server. Navigating to http://localhost:1234 you can see a tree structure of all elements, which can be modified from browser also. For example start the program, change the viewpoint and navigate to http://localhost:1234/controls/engines/engine and click on throttle and change the value to 0.2.