Saturday, December 25, 2010

Arduino and C#

In the previous article we use Serial Monitor tool to view received data and send data through serial port. Today we will write our standalone Serial Monitor like tool in C#.
We will create new Window Forms Application and add the following components from the picture
C# serial tool

The refresh button will add com ports to the combo box. Let see how it is implemented

Now when we have the name of serial port, we need to create serial port object and connect it, then send/receive data.

Be careful, do not write data directly to the output text box in read_serial_port function, because you can't access a control created in another thread. To do that you need to invoke some updater function like this

Lets write the "echo" program in Arduino and see how our tool works.

Now we will upload above code to Arduino and run the tool. And it works. hurray:)
Working serial tool
Thats all. Next time we will connect accelerometer to the Arduino and write a tool to see values of sensor on the computer.

Friday, December 24, 2010

Arduino and The Serial port

Arduino Duemilanove has an on-board serial port(connected to pins 0(RX) and 1(TX)), which used for communication with a computer or other device. It also used for uploading of the program to the board. Actually the board and the computer connected with USB port, but on board side there is a USB to Serial converting chip, and on computer side the driver convert Serial to USB(this is why on the Arduino software the type of connection port is COM port).

The Arduino software(IDE) has a "Serial Monitor" tool, for receiving and sending data through serial port. So we can using it see how the next program will run. We will write a simple program sending "Hello World" text through serial port.
// program: send "Hello World" through serial port
void setup()
{
  Serial.begin(9600);              //switch on serial port and set the speed to 9600 bits per second
  Serial.println("Hello World"); // send a text ...
}
void loop()
{
  // nothing to do
}
Copy above code to a new project, verify and upload it, then open Serial monitor. Set the connection speed to 9600(the speed set in the program). After reseting the board you will see the "Hello World" on the screen.
Serial monitor
Now lets try to enhance our program to use two way communication.
// program: send "hello World" through serial port
void setup()
{
  Serial.begin(9600);
}
void loop()
{
  if (0 < Serial.available()) // See is there any coming data
{
    int data = Serial.read();     // read first byte
    Serial.println(data, HEX); // print data in HEX
  }
}
The program see is there any data to read, if there is, read it and return HEX value. So lets run it and see how it works.
As you can see it prints the ASCII HEX values of inputed characters :).

There are many Arduino boards, the one we using for our programs is Arduino Duemilanove, which has only one serial port. But there are Arduino Mega boards, which has 4 serial ports. Those serial ports can be accessed the same way, changing Serial with Serial1, Serial2 and Serial3.
Arduino Mega 2560
More information about Serial can be found at Arduino site(http://arduino.cc/en/Reference/Serial).

Wednesday, December 22, 2010

Arduino and The "Hello World!"

Arduino is a hardware electronics platform for easy prototyping and for easy creation of automated systems, more information can be found here www.arduino.cc.
This is it.
Arduino Duemilanove (2009 version)
As you can see it has USB port(yes! It is USB, it is standard type B) to connect with a computer. We need Arduino software to work with it (http://arduino.cc/en/Main/Software).
It is a tradition to write "Hello World" to the screen as a first program. But our hardware hasn't any screen :(. So we need to think something different. There is a simple tutorial at Arduino web site http://www.arduino.cc/en/Tutorial/BlinkingLED which is described as the "Hello world" of Arduino. So let see what it does. It uses an external LED, which connected to the board and periodically switch it on and off. But there is a build-in LED connected to the pin 13, so we can use it instead of connecting external one.
Built-in LED
The programming language is based on C++(actually it is based on Wiring...), but it doesn't mean you can write a program including iostream, cining, couting and etc ...
The console c++  programs has a mandatory "main(argc, argv)" function, on the Arduino there are two mandatory functions void setup() and void loop(). The first function will called when the Arduino is powered on(or reseted), and then the second function called repeatedly in infinite loop. So lets write a simple program which switch-on the built-in LED.
// Program: switch on the LED
int ledPin = 13; // the LED connected to pin 13
void setup()
{
pinMode(ledPin, OUTPUT); // Configure ledPin as output pin
digitalWrite(ledPin, HIGH); // Switch on the LED.  
}
void loop()
{
// Nothing to do
}

The build-in LED connected to 13th pin, so we need to configure it as an output pin. digitalWrite function write digital 1(+5V), which will switch on the LED.
Now it is time to run it. First of all create a new project in Arduino Software
New Project
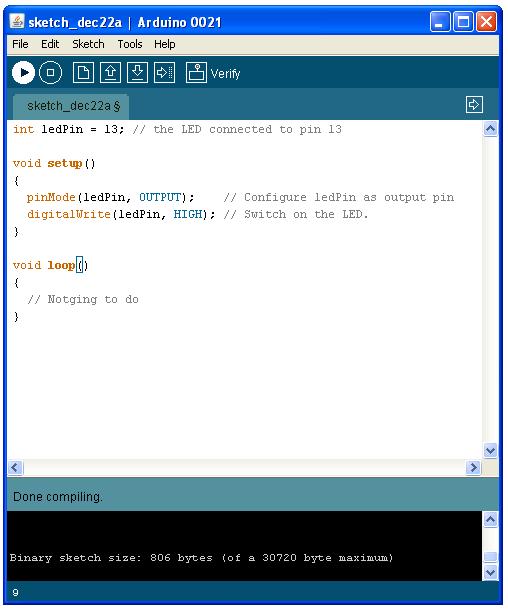
copy above source code and verify it(it compiles the code)
Verify
Now the time is to connect Arduino hardware to the computer and then choose the right board type and serial port.
Select board type
Now verify it again and upload.
Upload
It automatically start to run. It can be rerun(reseted) by on-board reset button
On-board reset button
Now we will enhance our program, to switch on/off the LED periodically
// Program: periodically switch on/off the LED
int ledPin = 13; // the LED connected to pin 13
void setup()
{
    pinMode(ledPin, OUTPUT);   // Configure ledPin as output pin
}
void loop()
{
    digitalWrite(ledPin, HIGH);  // switch on the LED.  
    delay(1000);                       // delay 1000 milliseconds
    digitalWrite(ledPin, LOW);   // switch off the LED
    delay(1000);                       // delay 1000 milliseconds
}

Thats all, next time we will write a program using Arduino's serial port.